Plying with a Spindle

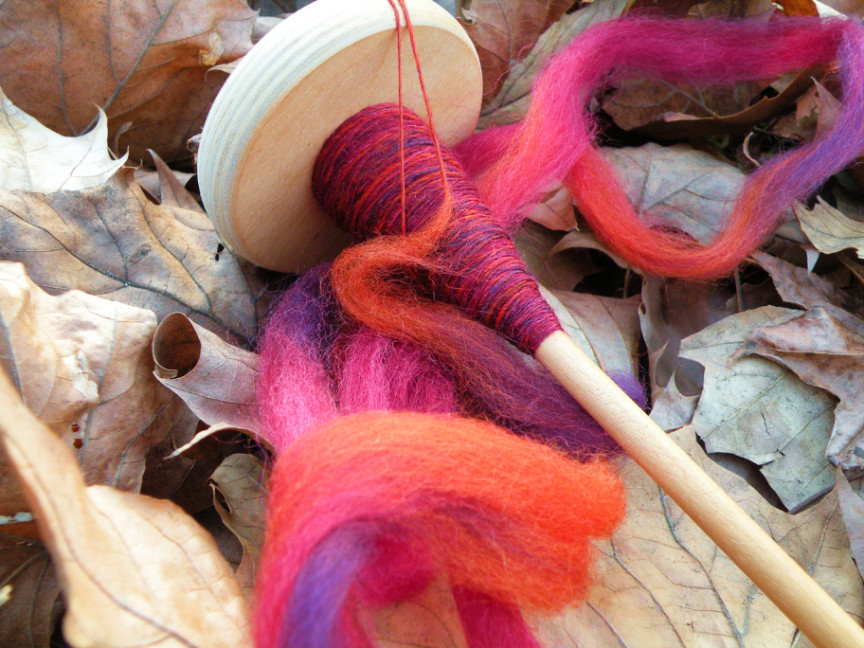
A friend of mine learned to drop spindle this past weekend, and now she’s got a spindle full of yarn. So what does she do now?! Well there’s plying, of course. But it’s intimidating for a new spinner to be sitting there with their first yarn on their shiny new spindle. How do they get it from spindle to plied yarn without disaster striking and making a mess of the yarn prettiness? Let’s take a look and figure that out!

Most spinners start with just one spindle. And that’s ok! We can work with that. The thing is that you need at least two sources of single yarn in order to ply it into a multiple (We’ll be looking at two-ply here.) ply yarn.

First off, some spinners prefer to allow their singles to sit for a bit, at least overnight, before plying. I tend to do this myself, often from laziness, but it’s something to consider. I feel that the singles settle down a bit and lose a bit of their energy when they’re allowed to rest. Don’t worry, that energy will come back once your yarn is set and will make for a delightful hank of yarn.

The quickest way to get pliable singles off of one spindle is to wind your single directly from your spindle into a center pull ball on a ball winder. Just hold the spindle in one hand and as you wind the ball winder let the spindle roll in your hand as the single winds off of it. Then take one end of the single from the center of the ball and one end from the outside of the ball, knot them together, stick that on the hook of your spindle, and spin your spindle in the OPPOSITE direction from which you spun the singles to twist the two singles together. Use the spindle just like you did when you were spinning: ply some yarn, store it on the spindle shaft, ply some more, store some more. (A quick interjection here about how much twist to put in your yarn as you’re plying it. I tend to over ply a little bit because I like the look of a tightly plied yarn. This usually works out nicely for me after the yarn has been set. But shoot for plying your yarn until the yarn can hang in a nice curve without twisting up too much onto itself. You’ll need to play with it and find your own plying point!) Then you’ll reach the center of your single and have a length of yarn that’s half the length of your single!

Sometimes this method can get fiddly, especially with the thinner spots of your single where the yarn may have more twist in it. One thing that may help is to put a toilet tissue cardboard on the shaft of your ball winder and wind the single onto that. Leave the cardboard in the ball of yarn as you ply from it.

Another good way to control the single is to wind a plying ball. Go ahead and wind your single onto the ball winder, cardboard or not, whatever works for you. Again, take the two ends, one from the inside of the ball and one from the outside. Wrap those two ends, held together, around a tennis ball. Or around a(nother) tissue cardboard. Or around a piece of PVC or around a tightly wadded up ball of paper. Whatever you can find. Abby Franquemont uses a coin! Watch her video on plying balls here: https://www.youtube.com/watch?v=jDOj6-s44pU The goal here is to wrap the singles, held together, around something that will hold that tension for you. Using this method will allow you to slide your fingers down the singles, putting a bit of tension on them and feeling for little pig tails and straightening them out as you go.

If you don’t have a ball winder, no biggie! Wind a ball of single yarn by hand directly from your spindle. Now your spindle is free to be filled again! Fill it up with more singles, and wind another ball of single yarn. Now take these two ball of singles and either ply directly from them, or wind a plying ball from them. Your two balls of singles will be different lengths, so just set aside your leftover length of single yarn and use it for something else. Don’t forget to ply in the OPPOSITE direction from which you spun the singles, of course!

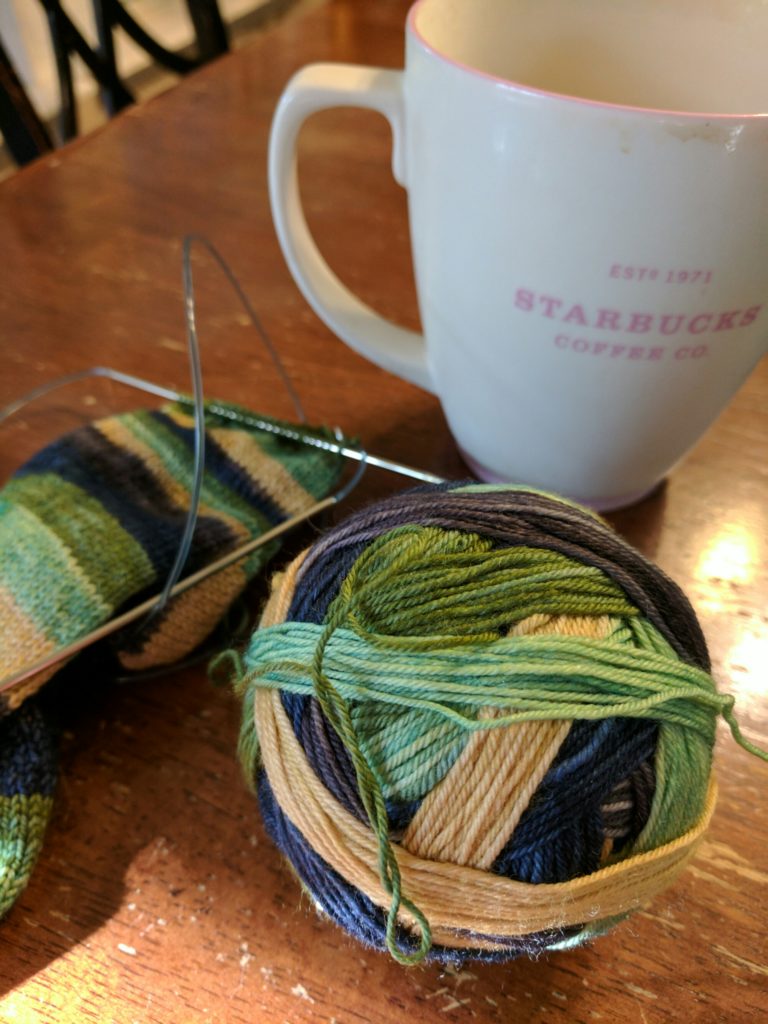
Now you have a lovely, two-ply yarn on your spindle. Now what do you do with *that*? Now the yarn needs to be set. Setting the yarn will get it nice and evened out so that it’s ready to be knit with. Everyone seems to have their own setting ‘recipe’. Imma gonna tell you mine. It’s worked for me pretty well so far, but of course do your own thing as you collect more knowledge and have more experience with making your own string. 🙂

The first step is to get the yarn into a hank. You can use a niddy noddy (https://preview.tinyurl.com/ybkuunc5) for this, or maybe wrap the yarn around your thumb and elbow. Here’s a great video with another technique that uses other body parts: https://www.youtube.com/watch?v=lx-fzUvlhg0 Regardless of how you do it, you need to get the yarn into a nice round skein. Tie the two ends of the skein together, then put to more ties on the skein so that it doesn’t get tangled in the bath. I soak most of my yarns in the hottest water from my tap with just a couple of drops of castile soap in it. I’ve used dishsoap in the past as well, but you don’t want enough to make lots of bubbles. Then in goes the hank of yarn. I usually leave it overnight, but that’s probably a bit of overkill. I’m going to say leave it there for at least two hours. What you’re looking for is for the water to really get soaked up by the yarn. Put a towel on the floor, remove the yarn from the water, and place the hank nicely laid out onto the towel. Fold up the bottom half of the towel so that the hank is covered, and roll the towel up with the skein inside of it. Now step on the towel to squish out as much of the water into the towel as you can. Then just hang your skein up over the shower rod or something. Let it dry, then enjoy!

Posted in scissors | Leave a comment

A Post For the Drop Spindle Class

Below is a link to the video I mentioned in class tonight. Even though I recorded it last year, I’m at least wearing the same shirt!

Here are notes on differences:
-Your leader yarn was already attached to your spindle when you received it. Here are instructions for putting one on!
-You can see that when I pull the roving into smaller sections in the video, I strip it down a lot more than we did in class tonight. You can always make your fiber sourse thinner if you aren’t comfortable spinning on such a big chunk of yarn. That’s why the folks who spent some time with the pencil roving tonight did better with the fatter fiber source afterwards.
-In the class I taught just before making this video, we pre-drafted *all* of our fiber. We didn’t learn about actually drafting fiber until the very end of the class! So instead of starting with a big hunk of fiber, we stripped the roving down into tiny little thin pieces of roving that didn’t need to be drafted at all. We just spun them up right away. You can do this too! But most of you seemed comfortable enough with drafting tonight that you shouldn’t need to.
Towards the end of the video I’ll talk about drafting, and that was all new to the last class. See, you’re ahead of the curve already!

Enjoy, and email me if you like, or bring questions to class!
https://youtu.be/yDL5TVxihBc

Posted in scissors | Leave a comment

A BlogHer Introduction

I have these friends, Denise and Tarrant (Or TW. Or TDubs.). They are both amazing. Like Chris and I, they pretty much come in a set. A #teamoftwo. They are great and best that way. Denise and TW are encouraging people. They are my biggest cheerleaders, and they spread love and support to all of our friends. They are generous and kind and smart and good. Since I’ve known them, they have inspired me to do things that I never thought could happen. I love them a lot.

I met Denise and Tarrant many years ago when TW wanted to learn to knit a pair of socks for Denise. That sock-inspired introduction was made possible through our friend’s blog, so you could say that a blog is why I even know them at all. Denise and Tarrant are bloggers themselves, so it’s natural that they would use their powers of encouragement to urge me and my other friends who have bloggy tendencies to blog more often and to find ways to do it better and faster and harder. They have been going to BlogHer as long as I’ve known them well enough to know what they do in their free time. Their mere attendence at these conventions has been motivational to me. It’s made me want to make more of my blog, and to evaluate it and ask myself where I want it to go and what I want to do with it. And that has often made me want to attend BlogHer myself. And this is finally my year!

So last night we’re texting about what rooms we’re in and when we’ll get there and what gin drinks will be consumed, when Tarrant starts to ask me the tough questions: What do you want out of this convention? What are your blogging goals? Are you meeting up with anyone? And then the big advice: You should put a fresh post on your blog… Gah! I kind of freaked out a little bit. Those posts take me HOURS to write, and I’m practically on my way out the door to Orlando! There’s no way I can do that. Ok, well maybe I’ll try to pop something quick up there as we’re driving on Thursday… yeah, that’s the ticket. Of course, they are spot on correct with that advice. And that’s why I’m sitting here at 5:30am on the first day of a blogging convention writing a blog post. My phone just buzzed to tell me about all the things I have to do this morning, but I haven’t even folded the laundry that I need to pack. I’m kind of headachy, and I’m hungry, but I’ve got my cuppa tea and the house is blissfully quiet. Blogging.

And with that long introduction, hi! I’m Sharon. I’ve had a blog, this very one, actually, for… jeez, at least fifteen years or so. It’s come and gone in many iterations, and like many casual bloggers it comes and goes for me as well. I tend to be more of a craft blogger than anything else. Sewing, knitting, and spinning are the things in my life that I love most, and I’m pretty damn good at them. Naturally, those are the easiest things to blog about.

But I feel change coming. I’ve come to terms with the fact that I’m not a great writer. I’m ok. I made good grades in English class. I have a solid grasp of grammar. But I don’t have a huge vocabulary (I am the worst Scrabble player ever.), and the words don’t flow from me when I type. Writing is a chore for me. But you know what comes easily? What I’m good at? Talking. I love that shit. I can babble on for days about the most mediocre things. It’s through audio and video (And real life transactions, of course) that my personality comes through to an audience. I’m much funnier and fun in ‘person’ than I am on paper.

Putting all of that on top of some major upcoming life changes, I’m going to be looking more at videocasting and podcasting. I’ll still keep the blog up and running! It will become a dashboard presence for the audio/video stuff, but the real content will be on the YouTubes I imagine.

I do have some big plans in my head, and that’s something I’ll be putting on paper this weekend at BlogHer, so do follow along! I Facebook a *lot*, so friend me there if you like (There’s a little button down there on the right side.), and of course say hello if you see me in person this weekend. I’d love to meet you and chat! I’ll be the one knitting the sock!

Posted in Spock | 2 Comments

What’s up with sock blanks?

I wanted to continue our Facebook conversation about sock blanks!

Here’s the first blank that I knit up from Gale’s Fiber Art. The half of the sock blank used for the completed sock was dyed slightly differently than the half of the blank that’s intact in the photo. But you can see how the dark petals of the rose appears as specks on the pink portion of the foot of the sock, and the negative hearts are speckled on the white of the sock.

SSV by GalesArt

Here’s a great blog post on the ‘picture’ yarn that I mentioned in the video. I was able to find just one skein on Etsy, but it looks like the dyer lists new stuff regularly.

Gale’s Fiber Arts wares can be found at clicky.
She has some of the double knit sock blanks that I talked about in the video!

Lorena’s work is here and her sock blanks are here.

Posted in scissors | 1 Comment

I bought a hat today.

Today was a big costume day. Chris and I took our niece to the Hoggetowne Medieval Faire, all of us in full costume. Chris and I had worn these costumes two years ago when we took Isabella’s brother to the Faire, but I made Isabella’s costume just this year. These are some of my favorite costumes. Viking wear is easy to make, easy to fit, comfortable, and I fucking love the bling. The ladies get *all* the bling *and* some weapons to boot.

IMG_20170204_160004

The thing I think about most when I’m in costume is the next costume. At the Faire, I’m scoping the other Ren costumes looking for ideas, and shopping at the vendors to improve what I’ve already got. This year I picked up a new little hand-woven cotton hoodie slash scarf that goes beautifully with this costume. But I’ve got future costumes in mind as well.

Witches in particular have been heavy in my head. Since we visited the Wizarding World of Harry Potter last year, we’ve been tossing around the idea of doing a couple of full sesh #classyasfuck witch costumes. Chris has a pretty good Cornelius Fudge costume (That lime green bowler that I knit and felted is pretty damn amazing, if I do say so myself.), and we’ve got a handful of Harry Potter themed accessories, but we’ve wanted to kick the HP theme up a notch. We want to do general, everyday, high end witches. And I just haven’t found the inspiration. Often a single piece of a costume will set off inspiration for the rest of the garb. With the Viking costumes this was the crazy awesome beaded jewelry. With Cornelius Fudge it was that lime green hat. I thought the Slytherin’s locket horcrux necklace would do it for me for these high end witch costumes. Its beautiful greens and golds made me think of flowy gypsy skirts and long, painted fingernails. Very nice, but not exactly what I want to do for the costume.

IMG_20170205_153532

So while at the faire this weekend I shopped for witch hats a bit. I had previously found a great Etsy seller that makes hand felted, not-quite-everyday, but not exotic either, hats. Such beautiful work. I couldn’t decide between two or three styles, though, and now I know why. Because that wasn’t the hat. THIS is the hat. I feel that I wear hats pretty well, and this one is no exception. The sales people at the booth were very much sales people, encouraging me to try it on, telling me how fabulous the hat looks on me. Even though they were selling hard, they weren’t exactly wrong. It’s a pretty damn fetching hat, and I think I can work it. And it fits. It fits spectacularly. Not too big, not too small. It’s the hat. The hat that will inspire an entire costume. And when you pick up the perfect boots at the thrift store for five bucks, you can splurge on the perfect hat. I just hope I will be able to wear the hat instead of the hat wearing me. ::crosses fingers::

So show me *your* inspiration! What was the piece that totally made your last costume?!

Posted in scissors | Leave a comment

My Sock Recipe

In a recent post I talked about my sock recipe. You may be wondering what exactly that is. So I’m going to tell you. A sock recipe is your own style of sock pattern. It’s where you take bits and pieces of sock patterns that you like or bits and pieces of sock patterns that written yourself and put them together to make your own standard, go-to sock pattern. It’s a little Frankenstein sock that’s all your very own. It took me a lot of experimentation to come with a sock recipe that I really and truly love. I did several recipes trying out different toes and different heels and such but there was always something just not right about each one. So the one that I finally come up with that you can see here on Ravelry is my go-to mostly because I finally don’t need a piece of paper or notes to tell me exactly what my next step is or precisely what to do next.


I’m going to talk a little bit about my recipe and how I ended up with this particular one. Let’s start at the beginning. Let’s start with the cast on. No wait. Let’s start before the cast on. Let’s start with the needles. I’m still a pretty big fan of double pointed needles, especially for small gauge projects like socks. But I lug my socks around a lot. Constantly. My sock is always with me. So having all these DPNs sticking out everywhere in my project bag which was thrown into my backpack which is thrown into the trunk of my car isn’t convenient. It can be a downright mess if those needles start slipping and stitches are bitches and fall off the needle. I have one of these cool little sock stitch holders but I can’t ever find it when I need it. Maybe I should buy a few more. But I’ve found that I really and truly love the convenience of knitting socks on one long circular needle. They don’t roll down the aisle at the theatre, either, allowing you to ‘make friends’ with the people directly in front of you for the next four rows as you wiggle under their chairs in search of your dropped dpn. Ask me how I know.


With needles chosen, I am ready to cast on. Do I cast on forty-some stitches and begin at the cuff of the sock? Or cast on a couple of dozen and begin at the toe? I learned to knit socks, as most of us have, going top down. I had a lot of problems with the cast on being too tight to fit around my calf until the Twisted German cast on saved my leg from handmade-sock-tourniquet hell. Twisted German is a very stretchy type of long tail cast on where you pick up one more string along the way. But back when I was doing two socks on one long circular needle, I tried Judy’s Magic cast on for a pair of toe up socks and never looked back. I was totally sold on toe up socks. That cast on definitely lives up to it’s magical name.


One of the other reasons why I like a toe up sock on a circular needle is because I feel that it’s easier to try on the sock as I go. With a top down sock I don’t know how the heel fits until nearly all of the sock is knit. Whereas on a toe up I can tell immediately after I’ve made the heel if I like to heel or not.


I usually cast on ten or twelve stitches on each of the two needle ends depending on how thick the sock yarn is, then increase 4 stitches every other row until I get to 24 or 26 on each side of the sock. I run with the stockinette for a while until I reach the area where the instep of my foot starts to get bigger. That’s when I start doing a double increase in the middle of the sole of the sock. I like putting the gusset on the sole because it is super comfortable for me, and doesn’t interfere with any pattern that I may be knitting on the top of the sock. It doesn’t show up at all when you’re wearing the sock and I don’t feel it at all on the bottom of my foot because it hits the spot of my foot where the arch is.


To do the gusset, I add two stitches to the middle of every other sole row until… Well that’s where the Sweet Tomato heel comes in. The Sweet Tomato heel does not call for a gusset on the sock. It’s a short row heel that usually fits similarly to an afterthought heel. But I’ve found that I like a little more wiggle room for my heel, so I put in the aforementioned gusset on the sole of the sock. But the Sweet Tomato heel uses two-thirds of the stitches of your sock circumference. This usually means moving stitches from one needle to the other in order to have the correct number of stitches on the needle to work the heel. So when I put my gusset in, I just increase on that half of the sock until I reach the required number of stitches for the Sweet Tomato heel! Easy as pie. Or easy as math. Which may be a bit more fiddly than pie. Unless you suck at making crust. But that’s another blog post for another time.

Copy of IMG_20170118_172332 (2)

So when I do the gusset, I add two stitches to the middle of every other sole row until the number of stitches on that side of the sock comprises two-thirds of the total number of stitches of the sock. Now, we’re going to do some math here. I SAW YOUR EYES ROLL UP INTO YOUR HEAD! Stop that! Because it’s not even really math**. Watch this: I’m going to increase the number of stitches on one side of the sock so that the number of stitches on that side equals two-thirds of whatever my NEW total of stitches will be. Now when I hypothetically get to the point where all of my increases are done, if two-thirds of my stitches are on one needle, then one-third of my stitches are on the other needle. And guess what! I already know how many stitches I have on that other needle! I have 24 or 26 or so, right? So I just double that number to know what number of stitches to increase to on the one side (Which will be the sole.) of my sock.


After increasing for the heel, I usually do three Sweet Tomato heel wedges. Sometimes I only do two. I really have to try on the sock a couple of times to decide whether to do two or three. Right after I do the heel wedges, I start decreasing gussets on each side of the bottom half of the sock. I put my stitch markers 8 stitches or so in from each edge and decrease every other row. At the same time, I slide in some 2×2 rib between the decrease gussets. This keeps the back of the… is that the heel area? Not really. The back of that piece of sock that keeps your achilles tendon warm. It keeps that snug up and looking good. Once those gussets and ribbing is done, it’s stockinette, stockinette all the way home!

Copy of IMG_20170118_171719 (1)

Er, mostly home. Stockinette all they way to some 2×2 ribbing at the top of the sock. And then a bind off! Now the opposite side of getting out of doing a stretchy cast on by doing a toe up sock is that you need a nice stretchy bind off. There are a few excellent tried and true methods out there. Elizabeth Zimmerman’s (Insert genuflect here) sewn bind off was always by go-to. I’ve used Jeny’s Surprisingly Stretchy Bind Off as well. But the one I keep going back to over and over again lately is a picot bind off that Lorena taught me years and years ago. You just cast on two stitches (Knit them on, or use a backwards loop), then bind off four stitches. So easy peasy that I had to ask her several times over several pairs of socks to remind me how she did it. But now I’ve got it strong!

 
What about you?! What’s your sock recipe? I’ll be looking for a sweater recipe soon, so please share any ideas pertinent to that with me too!

** Do you want to see the math? Yeah, here’s the math:  x = .333 * (24 + 24 + x)  I had to plug that shit into an online algebra calculator to figure out how it works and I still don’t know if it’s even correct.
Posted in scissors | Leave a comment

Making Time To Make

I want to craft more. But I work. Pretty soon I’ll be working A Lot. And I know I’ll be a bit disgruntled about not having enough Me time. Or sweater-knitting time. Or learn-to-tapestry-weave time. Or ren-faire-costume-sewing time. Definitely not enough blog time. I find myself day-dreaming about all the makes I want to make, but when I get home from the nine to fiver, I only have energy to sit and veg. Maybe hop on the Internet. Which leads me to Ravelry and to YouTube videos about weaving and to other lovelies that make me want to craft more, but ironically suck my time away from said crafting.

So what’s a girl to do? I have big dreams! Major plans! I did what I always do. I Googled that shit. I typed ‘making time for craft while working full time’ into that big old search bar, and here are some solutions that Google and I came up with.

My Habit Tracker in my planner is coming in pretty handy for jump starting the make habit. If I spend just ten minutes in a day knitting or spinning or purposefully doing anything crafty, I get a check mark in that column for the day. Virgos love check marks almost as much as we love making the lists to check things off from! I’m thinking that as I get further into the habit of making, I will increase the amount of time I should spend crafting each day before I earn that check mark.

20140815_175954

One website that I came across mentioned that you should give your passion project the best part of your day. When is the best part of your day? When is your brain the most alive and craving to do things that you aren’t doing right now? Often, that time for me is from 8 or 9am until lunchtime, during my regular working hours. But I do have my weekends! And sometimes long weekends. Maybe that’s the time of day I should be setting aside to craft. Save the other weekend stuff for later in the afternoon.

Do you eat lunch? Lunch time can be a great time to sneak in a half an hour of crafting. I’m lucky enough to live very close to work, so I can pop home at lunch time to grab a bite and knit a bit. And we’re talking about starting up a Friday lunch knit club at work!

Though it may sound counterproductive time-wise, I get a lot done when I attend a workshop or a class or a retreat. Yes, it takes time out of my weekend, but Chris and I love to travel together, and he is usually up for anything I throw his way. So SAFF, Maryland Sheep and Wool, and secret spinning gatherings over long weekends are definitely things in our lives.

I took a local tapestry weaving class recently and loved having the forced artsy time. I’ve made some attempts to recreate that time on a certain weeknight a month, but I get side tracked when Chris is around the house. He’s been doing some podcasting, though, and needs alone time for that. So maybe we can have forced artsy date night once a week. Hrm, good idea!

So how do you do it? When do you find time for your art?

Posted in scissors | 3 Comments

Give St. Distaff’ all the right: Then bid Christmas sport good night

Today, January 7th, is Distaff Day, or Roc Day. Historically, this day after Epiphany is when women return to their work after Christmas festivities. The twelve days have passed, and the holidays have wound down. The decorations were put away last night, and it’s time for women to get back to their main daily chore: spinning. The men get their own day on Monday, Plough Day, but this is about spinners. And we won’t talk about how the men sometimes get an entire extra week off. I mean, who’s going to feed the damn kids?


The distaff is a tool that holds fiber for the spinner as they spin. Seen as a medieval symbol for the feminine power and for women’s work, we spinners don’t often use distaffs any longer. The fiber we use has either been commercially processed or hand processed in a way that we don’t need to tie it to a stick to manage it. It’s pretty manageable on it’s own.


But today my spinning group will get together at my house. I’ll make champagne jello shots (We’re a classy bunch, we spinners.) and people will bring tasty nibbles for our spinning break times. And we’ll set up wheels and play with our spindles. Jane got an e-spinner recently and I want to check that out again. And we’ll celebrate Distaff Day in a way that women of the 17th and 18th centuries never expected: as a way to get back to playing.

first yarn

Spinning and cloth production was a natural job for women in our evolving species. Since women would need to be close to their children in order to breastfeed them, women weren’t regularly stomping off to the hunting fields. They stayed at home while the men went away to hunt. Being close to home, they tended fields and took care of the home and village. Because the furniture-like spinning wheel is a pretty recent invention, it was easy for the ladies to grab a spindle and make some thread while fussing with the kids. It’s an easy task to stop and start again. You don’t really lose your place if you set it aside to go make dinner. So it’s really always mostly been women’s work.


So women would spin year round while multitasking around the house. Then yule time would arrive and the spinning would tend to get set aside for a couple of weeks. There were decorations to put up and lots of food to make, both for immediate consumption and to store for throughout the winter. The daily work of spinning (Seriously, it takes a shit-tonne of thread to have enough to weave a decently sized piece of cloth. Women were spinning all the time.) could then be resumed when the xmas celebrations were over. Women would work all year, do different kind of work through the winter holidays, then get together in one last hurrah to celebrate getting back to their routine work. Work, work, work.


We modern spinners have kind of flip flopped that. We spin for fun. If we need fabric, we go to JoAnn’s. We don’t spin because we need to clothe our family. We don’t knit socks because we can’t buy them at Walmart. We spin and knit and weave because it’s relaxing and we we enjoy the process of making things. So while we are certainly getting back to our pre-holiday routines, our gathering is more about celebrating that fact that we have our own free time to work on hobbies after the hustle and bustle and extra work of the holidays.


I’m excited to see my friends today, and to share some bubbles and fiber with them. We’ll raise a glass to our spinning ancestors, thanking them for the art that they’ve passed down to us, even though it was hard work for them. Especially since it was hard work for them. Thank you, my spinners of old and my spinners of now, for counting me among your people.
Posted in scissors | Leave a comment

Sock

I always have a sock on the needles. It’s usually hanging about in my backpack or daily handbag, standing by in case of a board meeting or an unexpected long wait time at the car repair shop or when hand holding (Not literally. They frown on that nowadays.) at the tattoo studio. I’ll knit on it a little when Chris is driving us somewhere, especially if that somewhere is more than ten minutes away. That doesn’t happen nearly as often now that we live in town, but still, the sock is available.

The current sock is made of a gorgeous self-striping yarn made by my friend Caitlin at String Theory Colorworks. I really dig the self-striping stuff. When I finish a color of stripe, I get excited to see the next color come into play, and I keep knitting. The stripes keep me motivated.

The sock is always plain stockinette. That keeps things easy and I don’t have to think about it. The sock is always of the recipe that I’ve honed over the years, again, to keep things easy and I don’t have to think about it. (Recipe available here if you’re interested, though you’ll have to learn Cat Bordhi’s Sweet Tomato heel wedge if you don’t know that already. I think Cat Bordhi is a knitting fucking genius. A truly amazing inventor. Her mind works in ways that I can’t even imagine. Anyhoo, the recipe: http://www.ravelry.com/projects/idyllicchick/london-mud  And yes, you’ve got my little notes-to-self in there too. Enjoy.)

As I’ve developed my recipe of choice (Again, all of those notes on Ravelry for each and every sock I knit even though they are all so very similar.) and gotten more comfortable working without a pattern, I’ve wondered why I stopped knitting two socks at the same time on the one set of circular needles. It’s such a perfect idea! I’d only have to count rows once! Both socks would automagically be the same length and height! What a perfect world! So I did it. And it was an utter failure. 

Because if I make a mistake, it’s made on *both* socks. Then I have to rip back *both* socks. And I’ve lost twice as much time as I would have if I had simply made the mistake on one sock and then knit the second sock to match. And even though I’ve perfected my recipe, each different sock yarn I use is of a slightly different gauge. And even if I use my favorite sock needles which need to be replaced because I have worn them out, that difference in gauge will show up to surprise me every single time. 

Lesson learned, newly single sock. Lesson learned.

Posted in scissors | Leave a comment

In Praise of the Traditional Christmas Wish List

Chris and I tend to mix up Christmas gift giving a bit each year. One year we’ll do great big gifts of awesome, like the year there was a laptop, a Playstation, *and* a Wii, back when those were hell to get ahold of. And the next year we’ll do small, thoughtful gifts, like a small piece of jewelry, or something that we really need for the house. Last year we went to the big maul in Orlando together and had a really nice lunch with beers and took each other shopping. Chris came home with some fancy shaving stuff that he wouldn’t bought otherwise, and I bought a gorgeous fancy purse. Plus it was a ton of fun to spend an indulgent day together. Oh shit! I just remebered that that was the trip when Chris flim-flammed me into getting a new couch! So yes, that was kind of a big Christmas. One year I told him, ‘I want a concertina for Christmas and you have to get it for me.’ Guess what I got that year! Exactly what I asked for, and that was great!

The thing is that we usually just go ahead and buy stuff for ourselves when we want or need something. We don’t usually hold off very long on getting things for ourselves. We’ll think about it for an appropriate amount of time, but once we feel that we would really and truly use the thing, we just buy it. The reason the shopping trip worked so well last year is because we had both been thinking about buying those things, but hadn’t pulled the trigger yet.

And we always talk about how we’ll do Christmas well in advance. I don’t want to get Chris some $4,000 drone toy and end up getting a pack of rechargeable batteries in return. No one wins there. So when I brought it up this year, Chris said that he’d been working on a list and that maybe I could do one too. He said he had some crazy big stupid things on his list (Yes, there really is a $4,000 drone toy on there. Good luck with that, Buttercup.), but there are small things and reasonable things, and middle of the road things as well.

image

So I somewhat reluctantly began my wish list. One of the things that brought me joy about it making my list is that I could write it in my planner. I love writing lists in my planner. Especially if those lists will come to fruition within the next month. Especially especially if it’s a list of things that I want that I might get! I was stumped for a couple of days, but when Denise posted her planner wish list ideas, I went to town. I put a photo sticker printer on my list, along with all kinds of non-specific planner stocking stuffers like washi tape and stickers and stamps and such. From there I went to my Etsy favorites list, since I was kind of already right there looking at planner shit anyway. I added a sapphire stackable ring, and a metal clay setup (Look it up metal clay if you aren’t familiar with it. It’s kind of amazing.) Since I started it, I’ve gone back and added things to my wish list whenever I’ve realized there’s something I should be shopping for. When we had our first cold morning last week I got into my car to go to work and immediately realized that I forgot to buy driving gloves last year. Onto the list! When I started to shop for a new wallet, onto the list!

And while I’m making my list, I’m looking at Chris’ list too. Other than the aforementioned $4,000 drone toy, he’s got a couple of other slightly outlandish items there, along with some practical things that we should get anyway. And a bunch of really reasonable, fun things too! This was about the time that I realized the beauty of the Wish List. You have options, and your gifter has options. Say I want a puppy for Christmas. I can simply put ‘puppy’ on my list, and leave the fun part of choosing a puppy to Chris! Or I can put ‘hound puppy’ on my list, giving him some guidance, but not choosing my own puppy. I can even put ‘see link of puppy on Petfinder that I emailed you’ on my list if I’ve already choosen my puppy! It’s genius! It gives the gifter a chance to have fun shopping for you, picking out what colors and such he thinks you’d like, and it gives you the chance to name your specific gift if you are super picky about this one item. It’s so much more fun the going to an Amazon wish list and clicking buttons. The bonus is that if your list is comprehensive enough, you still won’t know what you’re going to end up with!

So start a list this year! And have your people start lists! And write them down and exchange them and send each other photos of your lists and have a very merry holiday season!

Posted in paper | 3 Comments